Setting up Email on Mozilla Thunderbird
To configure your Mozilla Thunderbird for email, please follow these steps:
The following instructions describe in detail how to create and setup your email account by using Mozilla Thunderbird. The instructions are easy to follow and can be used for setup of emails provided also by other web-hosting providers.
1. From Start choose Mozilla Thunderbird. (It is assumed that you have used this program before so as the Internet Connection Wizard is not initiated.)
2. Then go to Tools > Account Settings

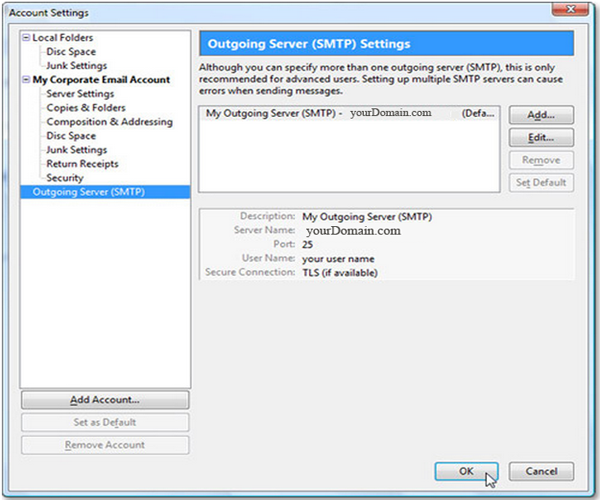
3. If this is the very first time you are using this email client, then you must define separately an outgoing server. To do so, below the block entitled Outgoing Server (SMTP) Settings click Add which is the first button on the right.

4. On the following window that appears entitled SMTP Server you are required to complete various fields related with SMTP server:
• Description
Enter a name that you will associate with your outgoing server settings.
• Server Name
Your outgoing server is yourDomain.com, where “yourDomain.com” is the name of your domain.
After entering Description and Server Name click OK.

5. After completing your outgoing server, you must input the settings of your outgoing server (SMTP) related with your email account. To do so, click Add Account which is the first button on the bottom left.

6. On the window entitled New Account Setup select Email account (this is the default option) and click Next.

7. On the next window Identity you are required to complete various fields related with your personal data:
• Your Name
Enter your name, your nick name, or your company's name depending on how you want to be displayed when you sent an email.
• E-mail Address
Enter your e-mail address (in the example we are creating an email account for an imaginary email: yourName@yourdomain.com).
After completing the above click Next.

8. On the next window Server Information you are required to complete various fields related with your email account data:
• Account Type
Should be POP3 (this is the default option).
• Incoming mail server
Your incoming server is yourDomain.com, where “yourDomain.com” is the name of your domain.
Also choose whether which you like to have a Global Inbox for your email accounts in case you will use Mozilla Thunderbird for additional email accounts. Also note that the outgoing server you defined earlier is by default selected to be used as your outgoing server (SMTP).
After completing the above click Next.

9. On the next window Incoming User Name you must enter your user name that is the email address you have been given and click Next.

10. On the next window Account Name Thunderbird allows you to give a name at this email account to be easier to identify in case you will use it for additional email accounts. After that click Next.

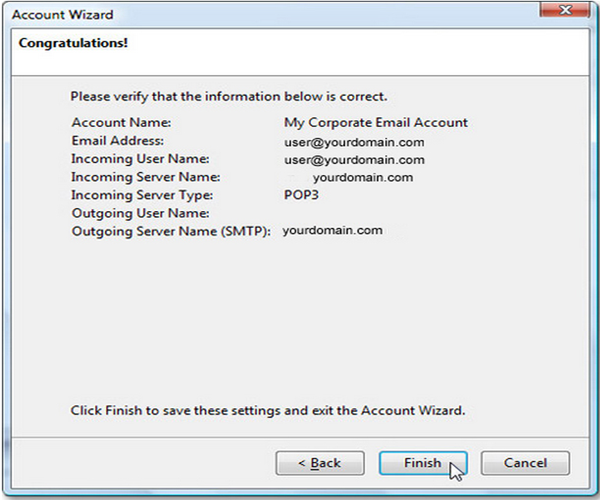
11. On the following, the account wizard summarizes the information you have put until now. If you have inserted all properly, click Finish.

12. The following window Account Settings summarizes your email accounts along with your outgoing server. Click OK to finalize.


